

|
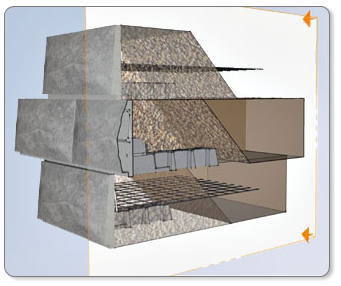
The various zones and components of a typical LOCK+LOAD faced wall are illustrated in this section. LOCK+LOAD has unique aspects that require different construction procedures than other MSE walls. First and most importantly, LOCK+LOAD allows and requires full compaction all the way to the face of the wall (back of the panel). Also, each row of LOCK+LOAD is founded upon the compacted fill of the row below. Download a detailed Installation Procedures as a PDF. The following sketches illustrate general concepts and procedures for installation of a LOCK+LOAD fascia on an MSE wall |
 |
|
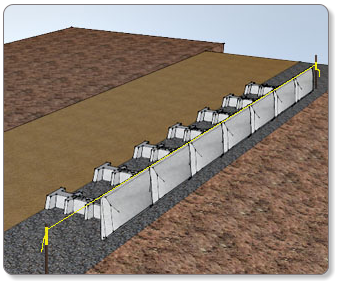
1. Set and Align Base Row Begin at a corner and align the first row of LOCK+LOAD modules to a string line, on a prepared foundation grade, with the panel backs plumb. Panels can be easily plumbed by tilting the counterfort and hand grading as needed. |
 |
|
2. Place Module Fill & Compact Once the modules are aligned 3/4” crushed rock is placed in the counterfort zone to a depth of ~2/3 panel height and compacted the reinforced zone fill is then placed to a like elevation. Compaction begins over the tail of the counterfort and then moves toward the wall face and then back to the end of the reinforced zone |
 |
|
3. Place Geogrid Soil Reinforcement Place the first layer of geogrid with the strength axis perpendicular to and abutting the wall panel. Again note, that the geogrid is turned up and touches the panel back. This row is then backfilled, and compacted to the panel top to prepare the base for the next row of LOCK+LOAD modules |
 |
|
4. Set and align Next Row The second row of LOCK+LOAD modules are aligned just behind and level with the top of the row below. Once alignment is set the panel backs are easily plumbed by tipping the counterforts and grading as required. Place & compact module and reinforced zone fill as before. When complete a third tier can be set and aligned. |
 |
|
5. Place Geogrid per Plans Geogrid is always placed per the engineered wall design but typically is at the panel midpoint on every other row of LOCK+LOAD modules begining at the second row from the wall top. Grid is to be placed flat and free of wrinkles |
 |
|
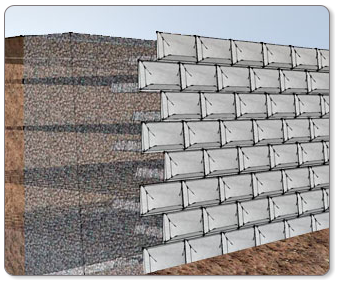
6. Continue Wall Erection to Final Height Backfill, compaction, and LOCK+LOAD module placement proceeds row by row until final wall height is reached and the wall construction is complete |
 |